/Screen_Shot_2021-01-31_at_08.14.02.png)
ဒီနေ့ tutorial မှာကတော့ DeepLab ရဲ့ နောက်ဆုံး Version ဖြစ်တဲ့ DeepLabV3 plus model ကို ဘယ်လို train ရမလဲဆိုတာကို hands on code နဲ့ ရှင်းပြသွားမှာဖြစ်ပါတယ်။ အသုံးပြုသွားမယ့် Dataset တွေကတော့ CamVid and Crowd Instance-Level Human Parsing တို့ဖြစ်ပါတယ်။ [ဒီ tutorial ရဲ့ code ကိုတော့ blog post ရဲ့ အောက်ဆုံး section မှာ တွေ့နိုင်ပါတယ်။
မှတ်ချက်။ ။ဒီ tutorial သည် Computer Vision နဲ့ Python Programming အခြေခံရှိထားမှ ကောင်းကောင်းနားလည်နိုင်ပါလိမ့်မည်။
Semantic Segmentation အကြောင်းသိချင်ရင်တော့ ဒီ post မှာ သွားဖတ်လို့ရပါတယ်။
DeepLabv3 + ရဲ့ architecture အကြောင်းကို အသေးစိတ်သိချင်ရင်တော့ ဒီ post မှာသွားဖတ်လို့ရပါတယ်။
ဒီ tutorial အတူလိုက်လုပ်ဖို့ ခန့်မှန်းခြေကြာမြင့်ချိန် 1 hour ဖြစ်ပါတယ်။ ဒီ Part 1 Tutorial အတူလိုက်လုပ်ပြီးရင် ဘာတွေသိသွားမလဲဆိုတော့
ဒီ tutorial ကိုအတူလိုကျစမျးဖို့လိုအပျတဲ့ requirement and framework တှကေတော့
Google colaboratory Notebook Setup
ကိုယ့်ရဲ့ google account ကနေ New > More > Google Colaboratory ကိုရွေးလိုက်ပါ။
DeepLabV3 plus model ကိုမစမ်းခင် အသုံးပြုသွားမယ့် dataset နှစ်ခုဖြစ်တဲ့
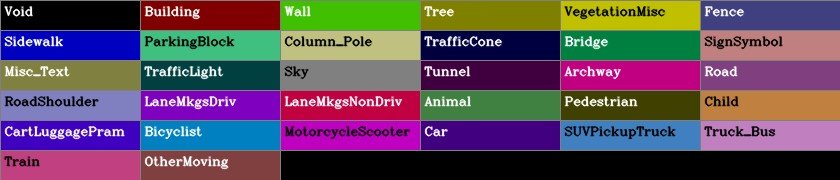
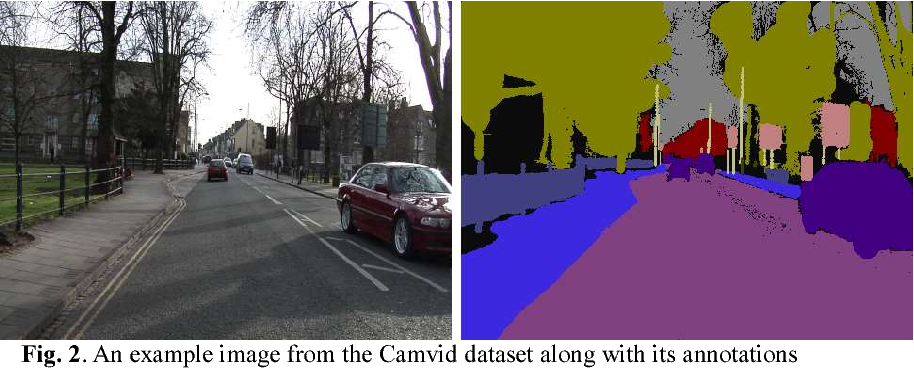
CamVid (Cambridge-driving Labeled Video Dataset)
CamVid video dataset ဟာ 2008 ခုနှစ်က segmentation and recognition research အတွက် အသုံးပြုခဲ့တဲ့ video dataset ဖြစ်ပါတယ်။ နောက်ပိုင်း video ထဲက frame တစ်ခုစီကိုဖြတ်ထုတ်ပြီး image dataset အနေနဲ့ပြောင်းခဲ့ပါတယ်။ တစ်ချို့ပုံတွေကတော့ CCTV ကနေ ဖမ်းယူပြီး တစ်ချို့ကတော့ car မှာ camera တပ်ပြီး ကားမောင်းပြီး ပတ်ဝန်းကျင်က object တွေကို video ရိုက်ယူခဲ့တာဖြစ်ပါတယ်။
Dataset မှာ class အရေအတွက် 32 ခုပါပါတယ်။
CamVid Image dataset ကိုတော့
CIHP (Crowd Instance Level Human Parsing Dataset)
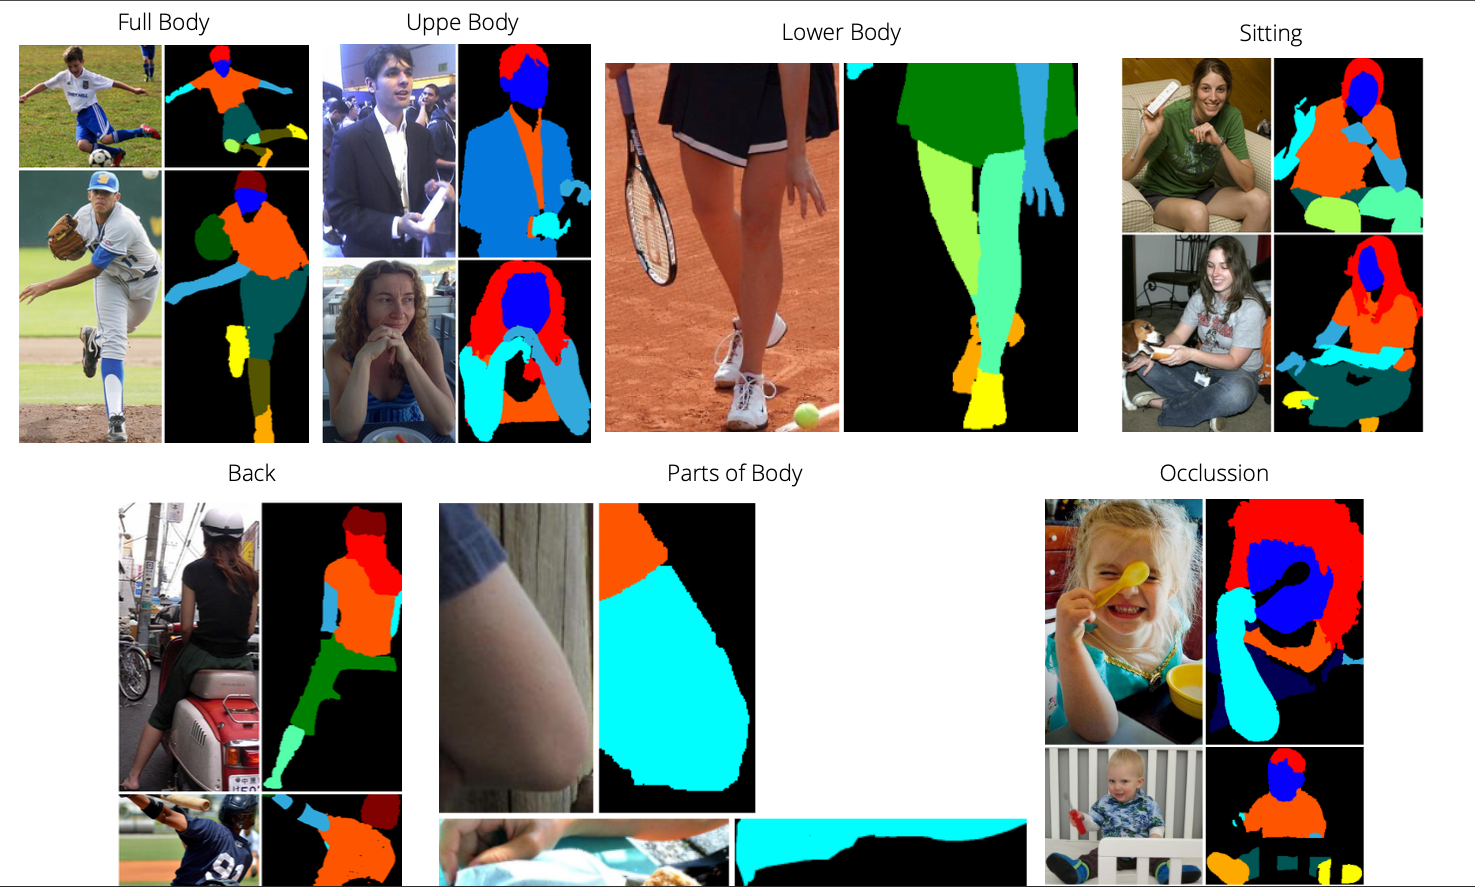
2018 ခုနှစ်တုံးက Human Cyber Physical Intelligence Integration Lab @SYSU research အဖွဲ့က လူတွေရဲ့ body အစိတ်အပိုင်းတစ်ခုခြင်းကို semantic segmentation လုပ်တဲ့ research အတွက် Look Into Person (LIP) dataset ကိုပြုစုခဲ့ပါတယ်။
အဲ့ dataset ကြီးကို Single Person, Multi-Person, Video Multi-Person Human Parsing and Image-based Multi-pose Virtual Try On ဆိုပြီး dataset 4 မျိုးထပ်ခွဲလိုက်ပါတယ်။
CIHP dataset ကတော့ Multi Person အမျိုးအစားဖြစ်ပါတယ်။ Pixel wise annotation class အရေအတွက် 19 ခုပါပြီး ၊ keypoints 16 ခုပါတဲ့ 2D Human poses တွေလဲပါပါတယ်။
CIHP dataset ကိုတော့
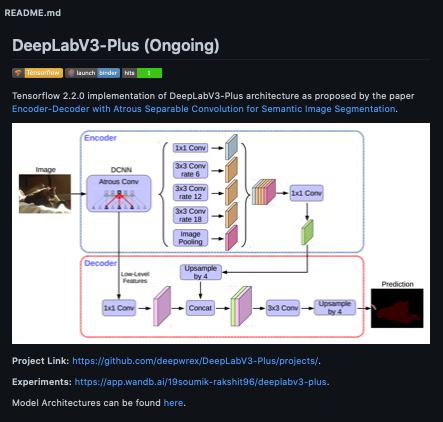
ဒါဆိုရင် DeepLabV3 plus tensorflow 2.2.0 implementation model ကို စဆောက်ပါမယ်။ ယခု post က beginner များအတွက် ရည်ရွယ်ထားတာ ဖြစ်လို့ model ကို ကိုယ်တိုင် implement မလုပ်ပဲ သူများရေးထားတဲ့ github repo တစ်ခုကနေပဲ reference ယူပြီး စမ်းကြည့်ရအောင်။
Reference Repo Link : https://github.com/lattice-ai/DeepLabV3-Plus
သူ့ repo မှာ CamVid and Multi Person Human Parsing Dataset တို့ကို စမ်းပြထားပါတယ်။
မိမိဖွင့်ထားသော colab notebook file မှာ cell အသစ်ယူပြီး reference လုပ်မယ့် github repo ကို clone လုပ်ပါမယ်။
! ရဲ့ meaning ကတော့ colab ရဲ့ bash(terminal) မှာ run မယ်လို့ပြောတာဖြစ်ပါတယ်။ ! မထည့်ရင် error တက်ပါလိမ့်မယ်။
ရိုးရိုး ကိုယ့်စက်ရဲ့ local terminal ကနေ git clone လုပ်ရင် file တွေက ကိုယ့်စက်ထဲဝင်မှာဖြစ်ပြီး colab ကနေ ! git clone လုပ်လိုက်ရင် မိမိအခု ဖွင့်ထားတဲ့ notebook server ထဲဝင်သွားမှာဖြစ်ပါတယ်။ Successful ဖြစ်ရင် left က sidebar မှာ ဒီလိုပေါ်နေပါလိမ့်မယ်။
သူများရဲ့ repo ကိုစမ်းမယ်ဆိုရင် အရေးကြီးဆုံးကတော့ သူဆောက်ထားတဲ့ project folder structure and README တို့ကိုသေချာ လေ့လာဖို့လိုပါတယ်။
Assets folder ကတော့ သူ့ရဲ့ github repo မှာ တင်ထားတဲ့ ဓာတ်ပုံတွေ ကိုသိမ်းထားတဲ့နေရာ။
Checkpoints folder ကတော့ model ရဲ့ weight file တွေ သိမ်းဖို့နေရာ။
Config folder ထဲက python file တွေကတော့ Camvid and Crowd Instance-Level Human Parsing dataset တို့အတွက် train ရင် လိုအပ်မယ့် hyperparameters တွေကိုသိမ်းဖို့ဖြစ်ပါတယ်။
Dataset folder ထဲက . sh file တွေကတော့ dataset တွေကို bash(terminal) ကနေ download ဖို့ဖြစ်ပါတယ်။
DeepLabv3plus folder ထဲက file တွေကတော့ model implementation, data loader, prediction result တွေကြည့်ဖို့ဖြစ်ပါတယ်။
Notebooks folder ထဲက. ipynb file ကတော့ model train ပြီးရလာတာတဲ့ weight တွေကို load လုပ်ပြီး demo အနေနဲ့ prediction result ကြည့်ဖို့ဖြစ်ပါတယ်။
Trainer.py ကတော့ ကိုယ်လုပ်ချင်တဲ့ config ပေါ်မူတည်ပြီး model ကို စ train ပေးတဲ့ file ဖြစ်ပါတယ်။
[ Note : မိမိကိုယ်တိုင် folder တစ်ခုချင်းစီ ဖွင့်ပြီး trace လိုက်ရင် ပိုပြီးနားလည်ပါလိမ့်မယ်။
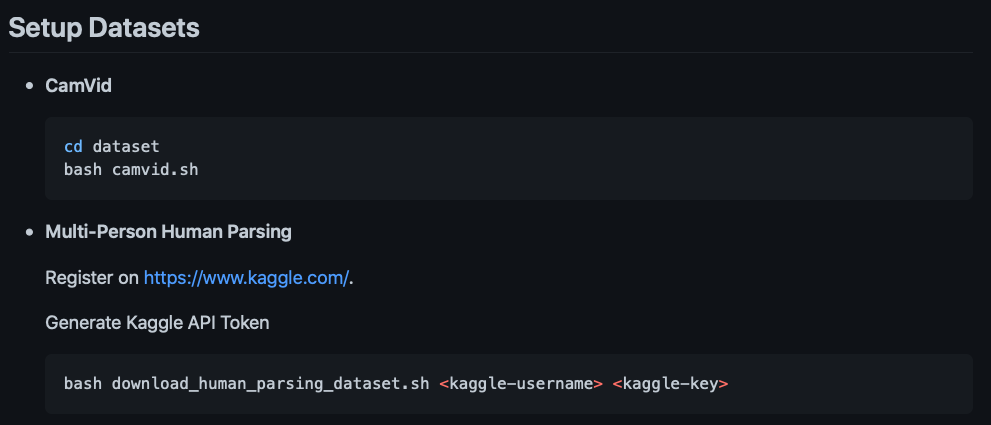
Original Repo က Readme ရေးထားတာကို ဖတ်ကြည့်ပါ။ Readme ထဲကရေးထားတဲ့အတိုင်း တစ်ဆင့်ချင်းစီ လုပ်ကြည့်ရအောင်။
Step 1) အနေနဲ့ မိမိစမ်းချင်တဲ့ dataset ကို download ဆွဲပါမယ်။
ဒီ post မှာကတော့ camvid dataset နဲ့စမ်းပြပါမယ်။
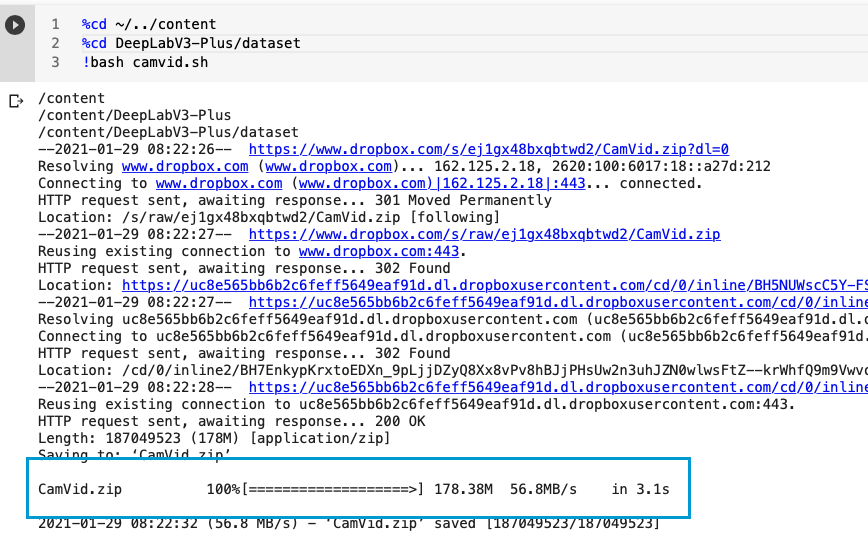
အရင်ဦးဆုံး ကိုယ့်ရဲ့ လက်ရှိ content directory ကနေ သူ့ရဲ့ DeepLabV3-Plus/dataset directory ကိုရောက်အောင်သွားရပါမယ်။
Line 1 ကတော့ root directory ဖြစ်တဲ့ content dir ထဲ ကိုသွားတာ။ Line 2 ကတော့ သူ့ repo ရဲ့ သက်ဆိုင်ရာ dataset folder ကို %cd နဲ့သွားတာပါ။
Line 3 ကတော့ camvid dataset download ဆွဲတဲ့ file (camvid.sh) ကို bash လို့ခေါ်ပြီး excecute တာပါ။
camvid.sh ထဲမှာအဓိကသုံးသွားတာကတော့ မူရင်း dataset dropbox download link ကို wget ဆိုတဲ့ python download utility ကိုသုံးသွားတာဖြစ်ပါတယ်။(download ဆွဲတဲ့ code ကိုသိချင်ရင် camvid.sh ကိုဖွင့်ကြည့်ပါ)
terminal ကနေ run ချင်တဲ့ code တွေစုထားတဲ့ file extension ကို . sh လို့ခေါ်ပြီး ! bash command က .sh file ကို execute လုပ်တာပါ။
Successful ဖြစ်ရင် dataset folder အောက်မှာ camvid ဆိုတဲ့ folder ရောက်နေပါလိမ့်မယ်။ အပေါ်က folder structure အတိုင်းမရှိပါက train လုပ်ရင် path လမ်းကြောင်း error တက်ပါလိမ့်မယ်။
သတိထားရမှာက readme ထဲမှာ bash camvid.sh လို့ရေးထားပေမဲ့ ကျွန်တော်တို့က colab ကနေ run နေတာကြောင့် terminal နဲ့သက်ဆိုင်ရာ command ရိုက်ချင်ရင် ! or % သုံးရတာ ဖြစ်ပါတယ်။
Step 2) DeepLab V3 plus Model Summary ထုတ်ကြည့်ပါမယ်။
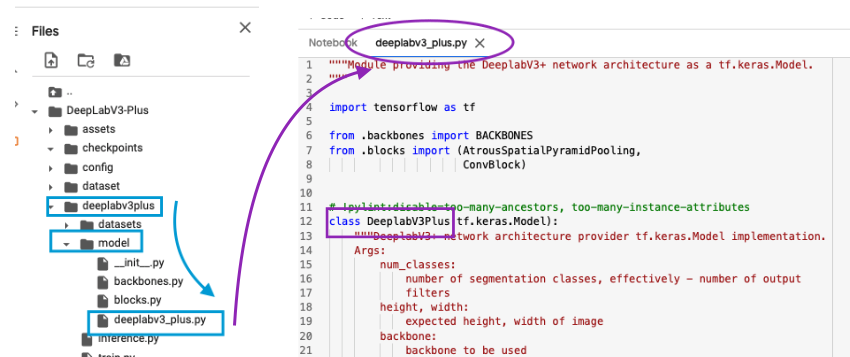
from import statement မှာ deeplabv3plus/model folder ထဲက python file (deeplabv3_plus) ရဲ့ class name(DeeplabV3Plus) ကို ခေါ်သုံးထားကိုတွေ့ရပါလိမ့်မယ်။
သူယူသုံးထားတဲ့ ပုံစံကို ပိုပြီးနားလည်လွယ်အောင် အပေါ်က ပုံမှာပြထားပေးပါတယ်။

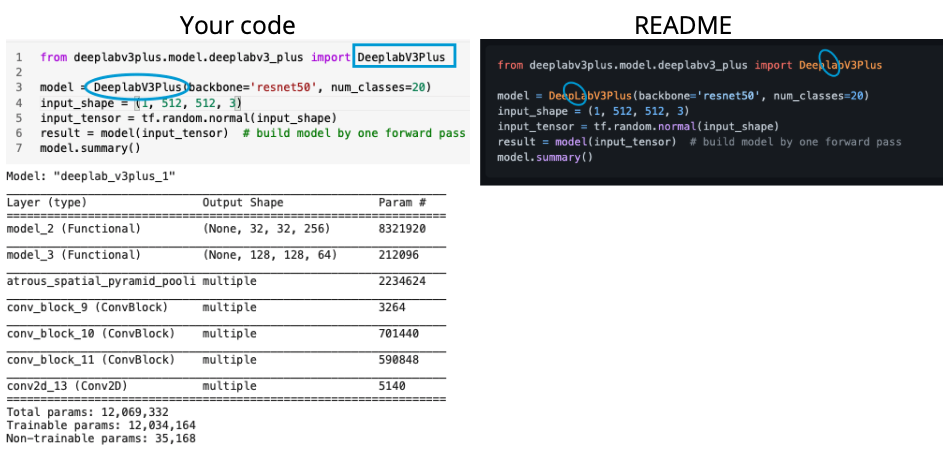
Model summary ထုတ်ကြည့်တဲ့အခါ README ထဲက code အတိုင်းရေးလို့မရပါဘူး။ မိမိရဲ့ လက်ရှိ current directory က git clone ထားတဲ့ folder (DeepLabV3-Plus) ထဲရောက်နေမှရပါမယ်။
အဲ့ folder ထဲရောက်မရောက်ဘယ်လိုသိမလဲ?
! ls လို့ရိုက်ကြည့်လိုက်ပါ။ အထက်ကပုံအရ ! ls လို့ရိုက်လိုက်ရင် မိမိလက်ရှိရောက်နေတဲ့ directory ထဲမှာရှိတဲ့ file and folder name တွေကြလာပါတယ်။ ဒီ file တွေ folder တွေကြည့်ခြင်းဖြင့် ကိုယ်က ဘယ် directory ထဲရောက်နေလဲဆိုတာ သိနိုင်ပါတယ်။
cd .. ကတော current ရောက်နေတဲ့ directory မတိုင်ခင်က directory ကို change မယ်လို့ပြောတာပါ။
ကျွန်တော်က dataset directory ရောက်နေတော့ ! ls ဆိုရင် dataset directory ထဲမှာရှိတဲ့ file and folder name တွေကြလာတာပါ။
cd .. ရိုက်လိုက်တော့ dataset dir မတိုင်ခင်က DeepLabV3-Plus dir ထဲ change သွားတာပါ။
နောက်တစ်ခု သတိထားရမှာက original repo ရဲ့ readme ထဲမှာ typo ပါနေတယ်။ import DeeplabV3Plus ရေးထားပြီး အောက်က model object ဆောက်တဲ့အခါမှာ L letter ကအကြီးဖြစ်နေပါတယ်။ Your code should be like left image.
ဒါဆိုရင်တော့ model summary ကို ထုတ်ကြည့်လို့ရပါပြီ။
summary ထုတ်ကြည့်ပြီးရင် ! ls ထပ်ရိုက်ကြည့်ပါ။ model မ train ခင် မိမိသည် DeepLabV3-Plus dir ထဲရောက်နေရပါမယ်။ ရောက်နေမှသာ trainer.py file ကို run လို့ရမှာပါ။
နောက်တစ်ဆင့်ကတော့ သူ့ရဲ့ original code ထဲမှာ wandb ဆိုတဲ့ library package ကို ခေါ်သုံးထားပါတယ်။ google colab မှာ wandb မရှိသေးတာမို့ ! pip install wandb ဆိုပြီး wandb ကို install ရပါမယ်။ install မလုပ်မိပါက Module Not Found Error တက်ပါမယ်။
Step 3) Model Training
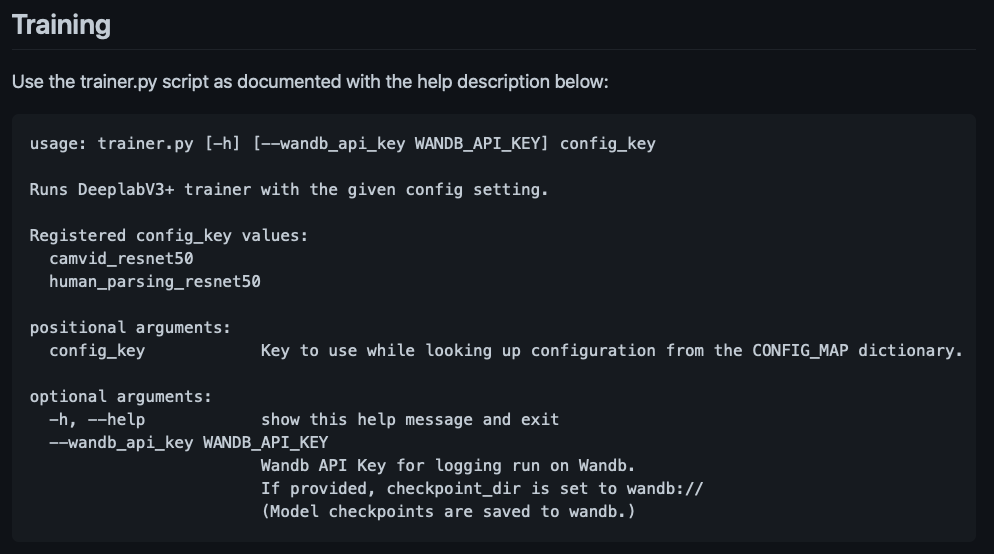
Readme ထဲမှာ ပြထားတဲ့အတိုင်း trainer.py script ကို သင်သုံးချင်တဲ့ config key ထည့်ပြီး run လိုက်ရင် model စ train ပါပြီ။
Readme ထဲမှာတော့ trainer.py ကို run မယ်ဆိုရင် argument 3 ခုထည့်လို့ရတယ်လို့ရေးထားပါတယ်။ Argument နှစ်ခုဖြစ်တဲ့ -h and --wandb_api_key ကတော့ optional argument ဖြစ်လို့ မထည့်လဲရပါတယ်။အဲ့တော့ ကျန်တဲ့ argument တစ်ခုဖြစ်တဲ့ config key ရဲ့ value ကိုထည့်ရင်ရပါပြီ။
Readme ထဲက အတိုင်း config key ရဲ့ value နေရာမှာ ကိုယ်က camvid dataset ကို train ချင်ရင် camvid_resnet50 လို့ရေးရပြီး human parsing dataset ကို train ချင်ရင် human_parsing_resnet50 လို့ထည့်ရမှာပါ။ [Note : တစ်လုံးမကျန်တူရပါမယ်]
အပေါ်က ပုံကတော့ camvid ရဲ့ configuration တွေပြထားတာဖြစ်ပါတယ်။ Configuration ဆိုတာကတော့ model train ဖို့အတွက် အရေးကြီးတဲ့ hyperparameters (dataset path, image dimension, class အရေအတွက်, batch size, backbone architecture, optimizer learning rate, epoch အရေအတွက်) တို့ကို file တစ် file ထဲ စုရေးထားတာ။ စုရေးထားခြင်းအားဖြင့် ကိုယ်ကတန်ဖိုး တစ်ခုခု ပြောင်းချင်တယ်ဆိုရင် တစ်နေရာထဲကနေ အလွယ်တကူ ပြောင်းလို့ရသွားပါတယ်။ ကျွန်တော်ကတော့ epoch တန်ဖိုးလျော့ ပြီး train ထားပါတယ်။ default epoch 100 ဆိုရင် training time 2 hours ကျော်လောက်ကြာပါလိမ့်မယ်။
အဲ့တော့ config ကိုဘယ်လိုပြင်မလဲ? Clone ထားတဲ့ folder ထဲက config folder ထဲက camvid_resnet50.py ကို double click နှိပ်လိုက်ပါ။ code ထဲမှာ မိမိထားချင်တဲ့ hyperparameter ကို ပြောင်းပြီး ctrl + S နဲ့ save လုပ်လိုက်ရင် ရပါပြီ။
ကိုယ် train ထားတဲ့ model file ကို သိမ်းထားချင်ရင် train.py ထဲ ဝင်ပြီး self.mode.save(“mymodel”, save_format=”tf”) လို့ရေးပါ။ save လိုက်ခြင်းအားဖြင့် နောက်အခါ ထပ်ပြီး train စရာမလိုတော့ပဲ အလွယ်တကူ model file ကိုယူပြီး prediction လုပ်နိုင်မှာဖြစ်ပါတယ်။ model save နည်း သေချာသိချင်ရင်တော့ tensorflow documentation ထဲဝင်ကြည့်ပါ။ ကျွန်တော် save ပြထားတဲ့ပုံစံကတော့ model ရဲ့ weight + architecture တစ်ခုလုံးကို save တဲ့ format ဖြစ်ပါတယ်။
trainer.py ဆိုတဲ့ python file ကို colab notebook server terminal ကနေ run ချင်တာဖြစ်လို့ !python ခံပြီး ! python trainer.py camvid_resnet50 လို့ရိုက်လိုက်တာနဲ့ model စ train ပါပြီ။
model train တာအဆင်ပြေပါက အထက်က ပုံအတိုင်း steps per epoch တစ်ခုစီ တက်နေတာကို တွေ့ရမှာဖြစ်ပါတယ်။
ဒါဆိုရင်တော့ model train လို့ပြီး သွားပါပြီ။ Part 2 မှာတော့ train လို့ရလာတဲ့ model ကို load ပြီးတော့ prediction ဘယ်လိုလုပ်ရမလဲဆိုတာကို ဆက်ပြောပြပေးသွားပါမယ်။
Segmentation ကိုစလေ့လာနေတဲ့ သူများအတွက် အကြံပေးချင်တာကတော့ model ကို ကိုယ်တိုင် implement မလုပ်သေးပဲ github ကသူများတွေရဲ့ repo ထဲက code, folder structure, readme file တို့ကို သေချာဖတ်ပြီး စမ်းစေချင်ပါတယ်။
သူများတွေရဲ့ code ကို တစ်ကြောင်း မကျန် နားလည်ပြီဆိုမှ သူများ code ကို ကိုယ့် code ဖြစ်အောင်ပြောင်းပြီး ကိုယ် စမ်းချင်တဲ့ dataset အတွက် data pipeline ပြင်ပြီး စမ်းရင် project အသစ်တွေထွက်လာမယ်လို့ ယုံကြည်ပါတယ်။
အဆုံးထိ လာရောက်ဖတ်ပေးတဲ့အတွက် အထူးကျေးဇူးတင်ပါတယ်ခင်ဗျာ။ အဆင်ပြေကြပါစေ။
My Code Link (Gist) : Source Code
OR
My Code Link (Colab) : Source Code
References:
https://github.com/lattice-ai/DeepLabV3-Plus
http://sysu-hcp.net/lip/index.php
Written By,
Hive Vision (Computer Vision Team)
AVAIRDS